
MSFS In-Game Panels
Installing the packages and keeping them current
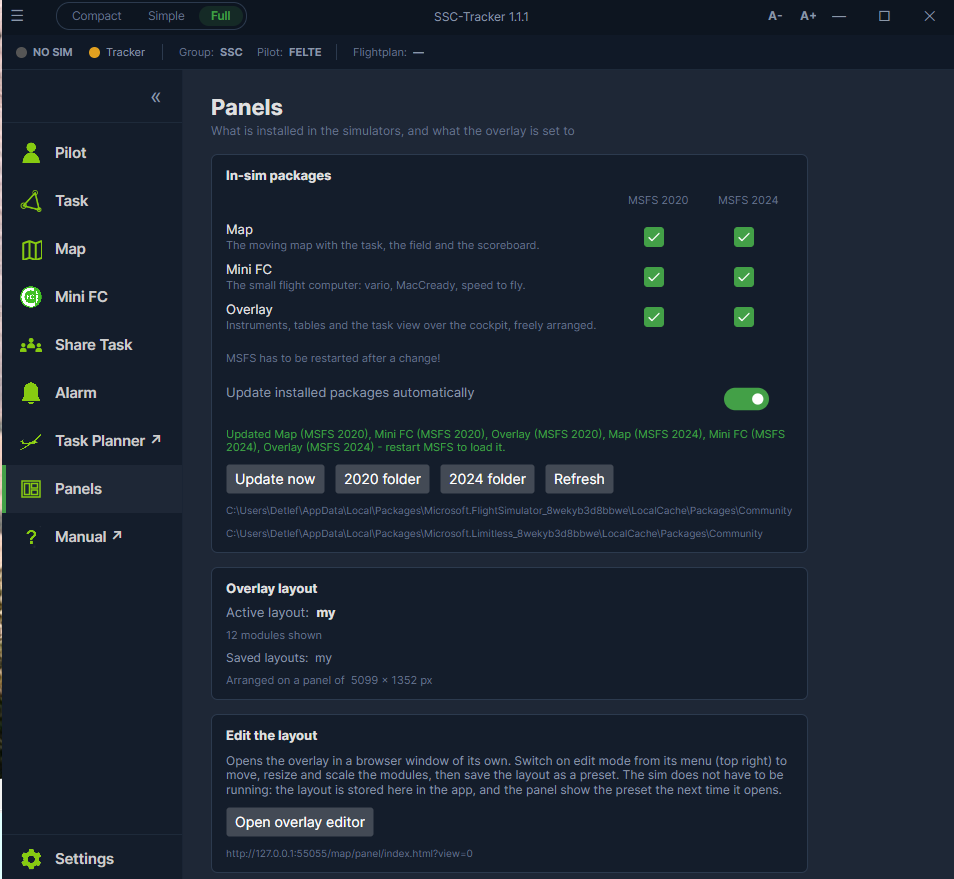
Three packages can go into the simulator: Map (the moving map with the scoreboard), Mini FC (the small flight computer) and Overlay (freely arranged instruments over the cockpit). The Panels tab has one tick box per simulator - MSFS 2020 and MSFS 2024 are kept separate.
Ticking the box copies the package there, clearing it deletes it again. MSFS has to be restarted afterwards: the simulator reads its Community folder only at start-up.
If the tracker cannot find a Community folder, you enter it in the settings under MSFS folders; the 2020 folder and 2024 folder buttons open it in Explorer so you can check.
Panel auto update. At every start the app compares what is installed with what it brings along, and copies over the differences. This only affects packages you installed yourself; it never adds new ones unasked. If MSFS happens to be running, the update is left for the next time. You can switch this off in the same tab, and Update now triggers it by hand.
Map panel
The app brings the package with it. To install it, tick the box for the simulator you want in the Panels tab and restart MSFS.
The panel loads the SSC-Tracker map (localhost:55055/map) straight into the MSFS cockpit and shows all group members on it. All map functions (scaling, data table and so on) are available in the panel as well.
Installation
- In the Panels tab, tick the box for MSFS 2020 or 2024.
- Restart MSFS.
- In the cockpit, switch the SSC-Tracker panel on from the menu of the panel bar.

A note on Coherent GT
The panel uses Coherent GT as its browser engine (internal to MSFS). It has limitations compared to an ordinary browser - particularly with certain CSS effects.
Mini FC
The small flight computer: a variometer with four pages. It runs as an in-game panel in the cockpit and just the same in a browser (/minifc) - on a tablet beside your monitor, for instance.
Alternative values
Every value switches on click through several quantities. Whatever was shown last stays - so you build the combination that suits your flight.
| Field | Click cycles through | Meaning |
|---|---|---|
| Speed | TAS → IAS → GS | True, indicated and ground speed |
| Height | MSL → AGL → MSL ARR → AGL ARR | Your own height above sea or ground, then the arrival height at the next turnpoint - above sea and above ground |
| Distance | DIS WP → DIS FIN | To the next turnpoint or to the finish |
| Netto / speed to fly | NETTO ↔ STF | Averaged netto climb, or the speed to fly for the MacCready setting |
Plus TTG: the estimated time to go.
About the arrival height: the reference is normally the terrain at the turnpoint - if the point has a minimum height and that is higher, the minimum height applies. So an arrival height of 0 does not necessarily mean ground level.
The scale
It shows climb, the netto value and the MacCready setting on one and the same scale - read the way you read an analogue instrument. The MC you set here is not tied to any MC the aircraft may have; in SSC-Tracker it stands on its own.
Controls
| Control | Effect |
|---|---|
| Button top right | MacCready +0.5 (up to 5.0) |
| Button bottom right | MacCready −0.5 |
| Middle button on the right | Setup page |
| The four corner buttons | Pages: Main · Map · Task · Player |
The four pages
- Main - the band described above with the numeric fields.
- Map - a small map with the task and the field.
- Task - the turnpoint list.
- Player - the other pilots in the group.
Setup
The setup page holds the units (height, distance, speed, climb), the linear or logarithmic scale, colours, whether other pilots are shown, a reset and - in the browser - the field for the IP of the machine the tracker is running on.
Overlay (Glide Panel)
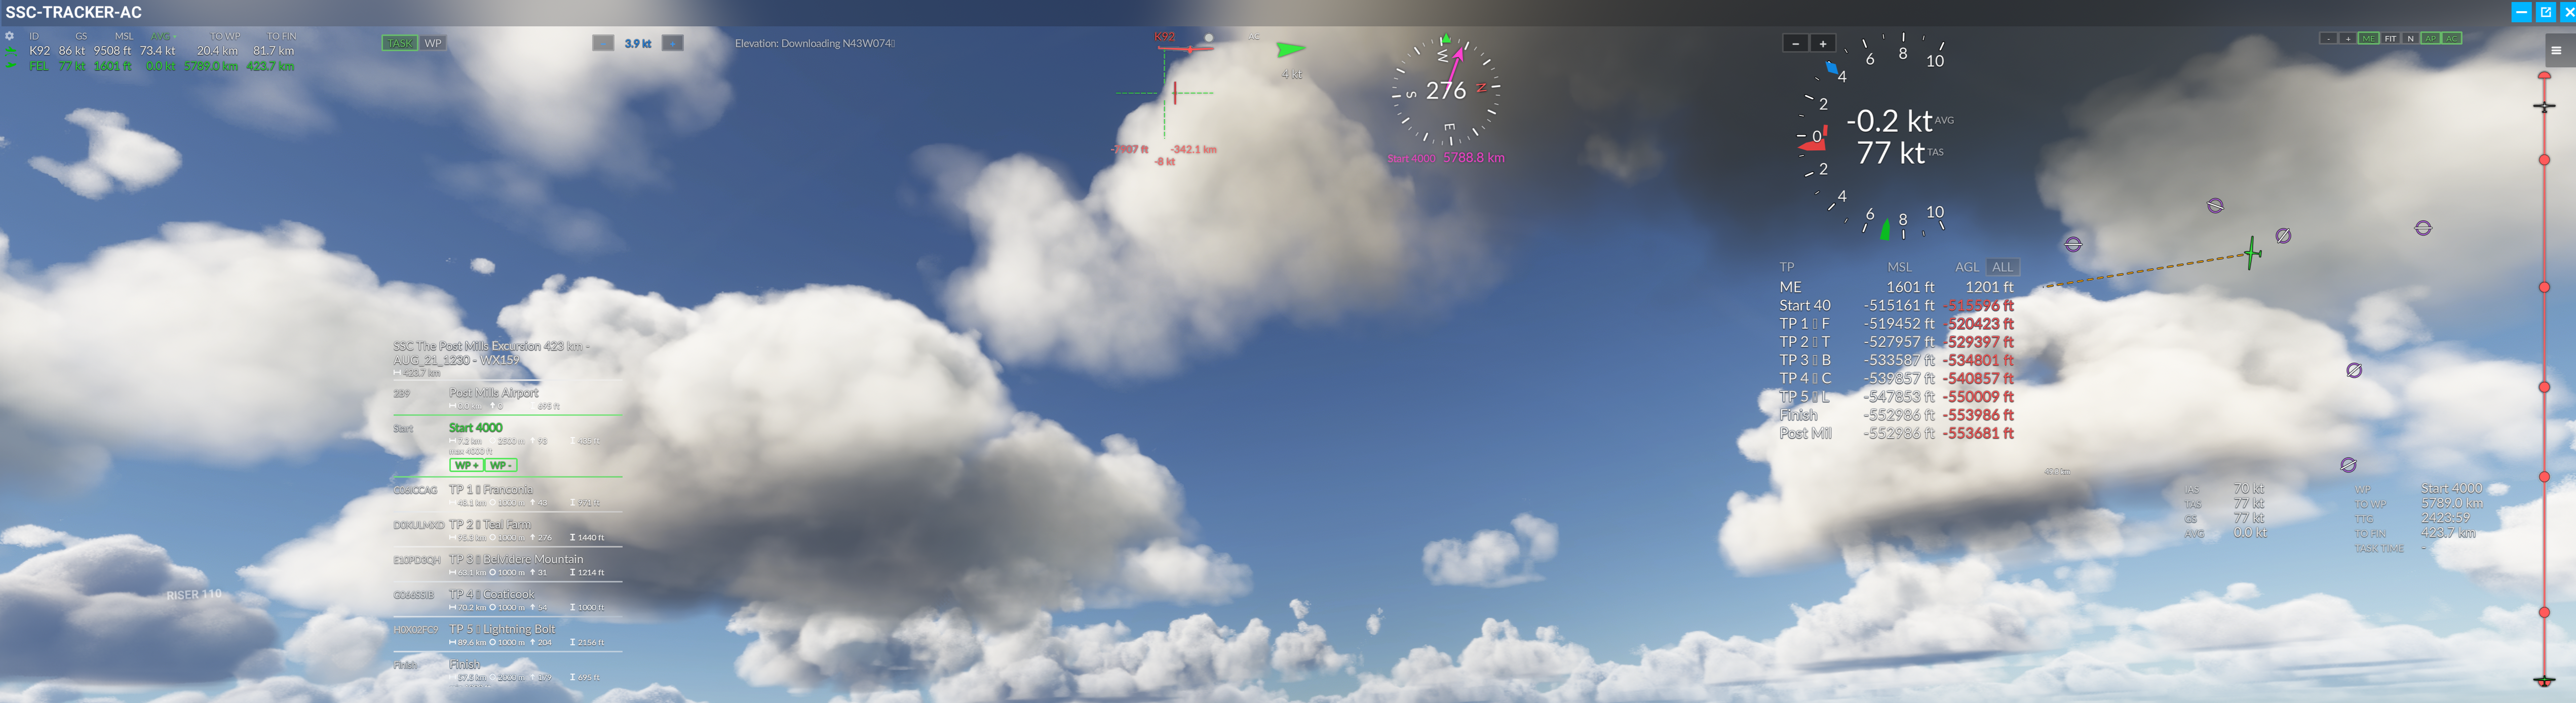
The Overlay offers transparent instruments floating over the cockpit, each one switched on and off separately, moved freely, scaled freely. The idea comes from JackBilbo's LXN Online.
The three modes
The panel lies over the cockpit - so that both the cockpit and the modules stay usable, there are three states:
| Mode | Clicks | What for |
|---|---|---|
| view | go to the cockpit | Pure head-up display. The modules hide their own buttons and cannot be operated. |
| control | belong to the panel | The module buttons work: AC on/off, NEXT/ALL, MC + and −, sorting tables. A green frame marks this state. |
| edit | belong to the panel | Like control, plus moving, scaling and saving the layout. |
You switch between view and control with the mouse: moving to the right edge of the panel brings the clicks to the panel, moving to the left edge gives them back to the cockpit. In control and edit the cockpit cannot be operated.
edit mode is reached through the menu only (Edit Mode = on/off).
The menu
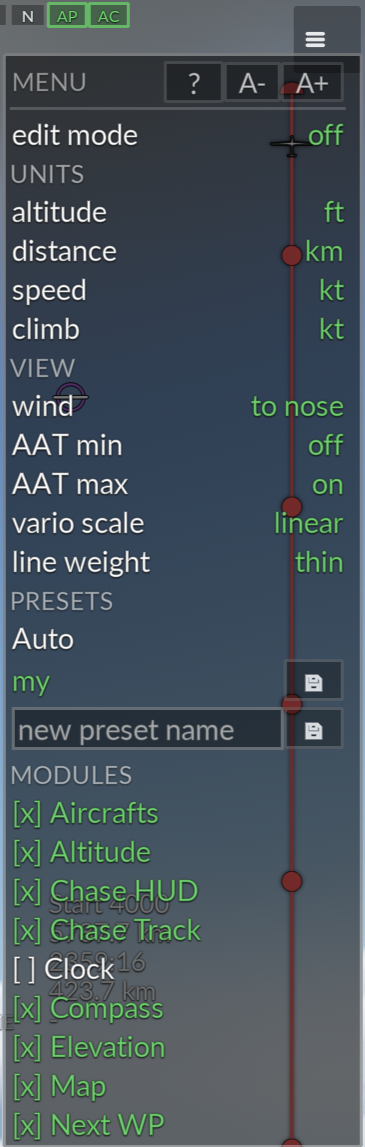
Top right, through the menu symbol. It contains everything the panel can do:
- help - the short guide to the Overlay panel.
- edit mode - on and off.
- UNITS and VIEW - units and map options. These are the settings of the app, identical with every other tracker view.
- line weight - the width of the drawn lines. bold helps in VR, where the whole panel is small and far away.
- PRESETS - saved layouts.
- MODULES - the list of all modules, to switch on and off.
The modules one by one
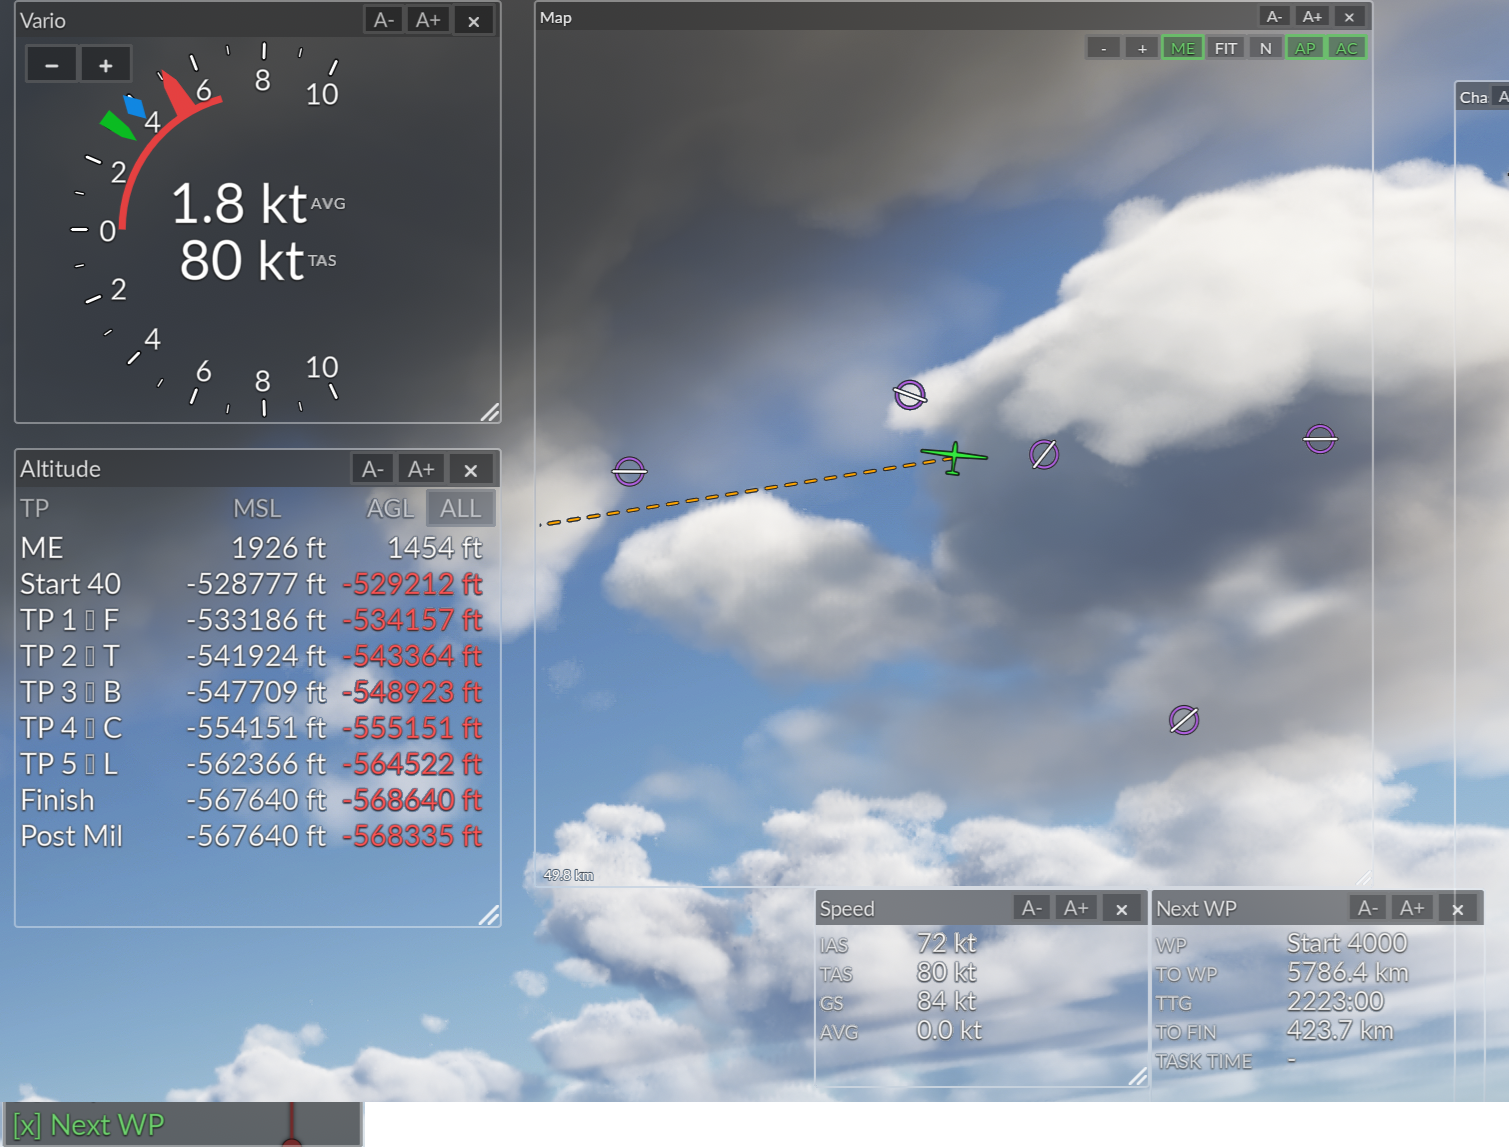
Every module can be switched on and off, moved, and scaled in size and font separately. Buttons inside a module only work in control or edit mode (in view mode they are hidden).
Aircrafts
The field as a table - the same scoreboard as on the map.
- Choosing columns: the gear wheel to the left of ID. The selection is the same one the map uses (the narrow column set), so a change takes effect in both places.
- Sorting: click a column heading; the same click again reverses the direction. The default is AVG descending - a scoreboard is read by average speed.
- Choosing a chase target: click a pilot ID. The row gets a green bar; clicking the same ID again switches back to automatic (the nearest one).
- On the left of each aircraft is its state symbol (on the ground, airborne, on task, engine, pause, slew, finished, ghost) - the same symbols as in the map table.
Map
The task, with the start and finish semicircles, turnpoint cylinders, AAT sectors and the dashed line to the next turnpoint.
| Button | Effect |
|---|---|
| − / + | Scale |
| ME | Centre on your own aircraft |
| FIT | Zoom to the whole task |
| N | North up / track up |
| AP | Airfields on/off |
| AC | Other pilots on/off |
Task
The turnpoint list with distance, name and the AAT details - the next point highlighted.
Next WP
Five lines about the current leg: WP (name), TO WP (distance), TTG (time to go), TO FIN (remaining to the finish) and TASK TIME.
Clock
| Line | Meaning |
|---|---|
| LOCAL | Local time in the simulator - how much of the day is still ahead of you. That is why it is the large one. |
| UTC | Simulator time in UTC - the time weather and tasks are worked out in. |
| REAL | The real clock of your computer. |
Altitude
A table of arrival heights: TP · MSL · AGL per turnpoint.
- NEXT / ALL switches between "the next point only" and the whole task.
- AGL turns red when the arrival would be below ground, and yellow when the point's minimum height is the binding floor. MSL turns red when a maximum height would be exceeded - that includes a maximum start height.
Speed
IAS · TAS · GS · AVG - indicated, true and ground speed, plus the average on the task.
Vario
The variometer from the Mini FC. − and + at the top left set MacCready (the same value, decoupled from the aircraft, as in the Mini FC and the app). In the middle two values: AVG (averaged climb) and TAS.
Wind and Compass
Wind direction and strength, and the direction to the next turnpoint.
Elevation
The terrain section with the glide path.
- TASK shows the whole task, WP only the current leg.
- − and + set MacCready; the glide path follows at once.
Chase HUD
The HUD for the aircraft you are chasing: bearing and distance, and along the bottom edge the differences to you - distance, height, ground speed. Green means you are ahead, otherwise red. With no target it says NO TARGET; the target is picked in the Aircrafts table.
Chase Track
The whole task as a vertical band with the selected ghost or aircraft on it.
Layouts
The first time you open it, the panel arranges all modules by itself. Later you reach that function through Auto in the menu. It arranges all modules for the current size of the panel window.
A layout of your own is made in edit mode: move modules by their title bar, drag the bottom right corner to resize them, scale the module's font with A−/A+. Then type a name into new preset name in the menu and click the save symbol. Later you overwrite a preset with the save symbol in its row, or throw it away with the X.
The layouts live in the app, not in the simulator. They therefore survive a reinstallation of the package - and they can be built without a running sim, through the Open overlay editor link in the Panels tab.
In VR
The Overlay is made for the desktop; it is not optimised for VR yet. line weight → bold can make it more readable.